OEM PINOUT DIAGRAM: DENSO RF7x.png (Platform / Bench)526,297 bytes
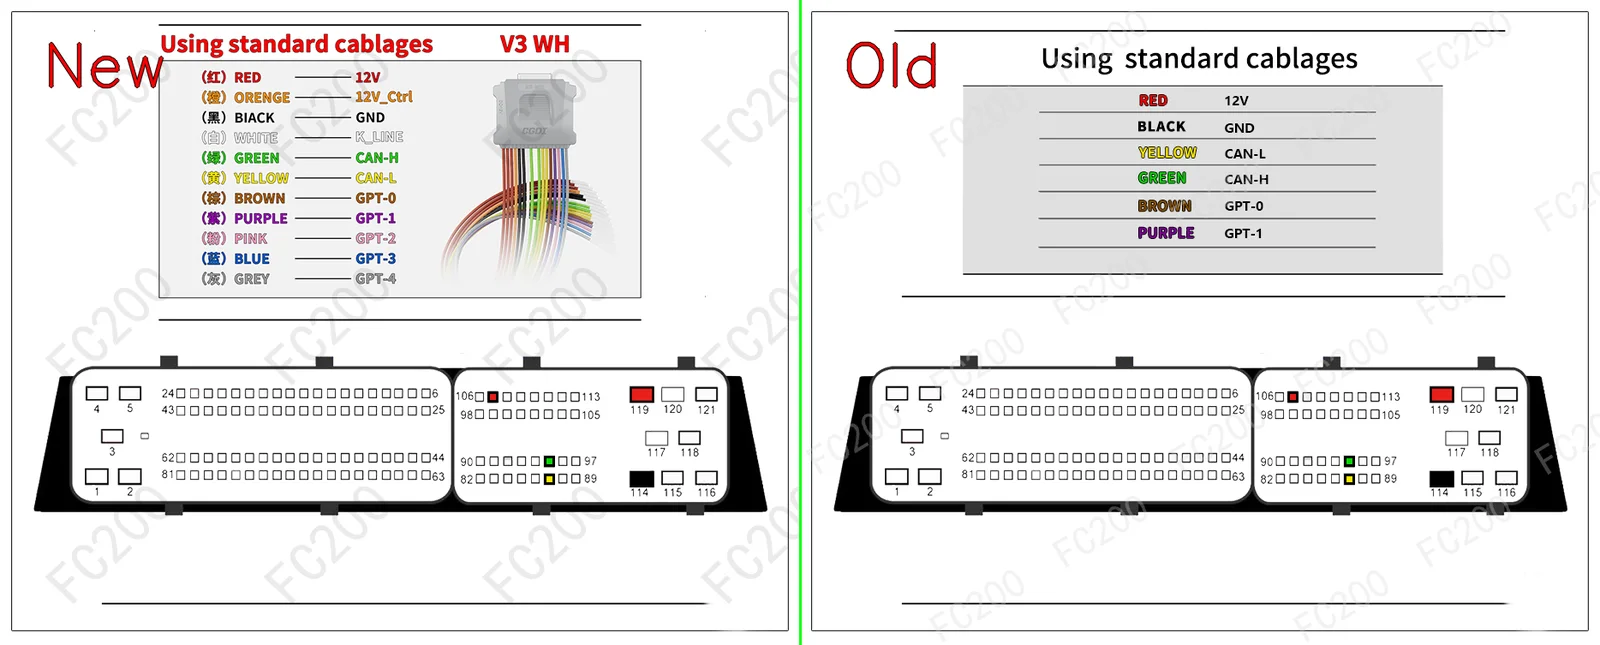
STEP-BY-STEP BENCH CONNECTION PROTOCOL (HOWTO)BENCH / BOOT
- Step 1 (Terminal 30 & Terminal 15 power): Apply stabilized
13.5V — 13.8Vto the permanent power (T30) and ignition (T15) pins, plus ground (GND), following the cable color coding above. - Step 2 (CAN bus & GPT0 / GPT1 generator lines): Connect the
CAN-HandCAN-L, plus the signal wiresGPT0 (S1)andGPT1 (S2)to enter service mode without opening the ECU case. - Step 3 (Full PFLASH + DFLASH backup read): Before any write operation, read and save a full backup of the internal flash (
PFLASH) and the EEPROM area (DFLASH).
VEHICLES FITTED WITH THE RF7X ECU (6)FITMENT
| Brand | Model & Engine | ECU & MCU | Open |
|---|---|---|---|
| Mazda | 5(CR) (2000 MZR-CD • 110) | DENSO RF7x (SH7058) |
Open vehicle → |
| Mazda | 5(CR) (2000 MZR-CD • 143) | DENSO RF7x (SH7058) |
Open vehicle → |
| Mazda | 6(GH) (2000 MZR-CD • 140) | DENSO RF7x (SH7058) |
Open vehicle → |
| Mazda | Atenza(GH) (2000 MZR-CD • 140) | DENSO RF7x (SH7058) |
Open vehicle → |
| Mazda | All Models (Direct ECU Connection) (Read/Write ExtEEPROM/PFLASH, CheckSum) | DENSO RF7x (SH7058) |
Open vehicle → |
| Universal ECU Protocol | Asian Denso / Mitsubishi Melco / Delphi DCM ECUs (Platform / Bench) (Direct bench connector access (Bench / Boot)) | DENSO RF7x (SH7058) |
Open vehicle → |